Wednesday 24 December 2014

Robins on a branch...

I saved this Christmas project 'til last as I absolutely love these robins, another new Christmas stamp from Crafty Individuals. Again I've used watercolours to create a soft focus effect and I've put them on a wooden tag I picked up from The Range - originally it was a Christmas decoration and even played a tune - I just dismantled it all to make my tag! A nice bit of sanding gave it a real distressed look.


Thanks for looking, thanks for all your kind comments over the year  and have a lovely Christmas!

Helen

Monday 22 December 2014

A touch of magic....

That's how I think of this beautiful new stamp from Crafty Individuals. It works really well with a watercolour background:


Thanks for looking!

Helen

Saturday 20 December 2014

Greens and Blues this time....

Here I've gone for Mowed Lawn and Broken China with a touch of Pebeo silver foil and I much prefer the colour scheme! The beautiful reindeer stamp is from Crafty Individuals:


Thanks for looking!

Helen


Thursday 18 December 2014

It's Christmas....

Just a quick post of one of the Christmas cards I've made this year:


I used slightly non traditional colours for this one (used the Kaleidacolor Desert Heat inkpad) - looking at it I think I prefer reds and greens!
The stamp is Penny Black and the greeting comes from a Crafty Individuals stamp.

Thanks for looking!

Helen

Thursday 11 December 2014

Blooming marvellous....

 I've got another experimental post this month over on the PaperArtsy Blog, this time with one of their flower dies, Scallop Flower. I thought I'd try it out in as many different materials as possible, layering them up, cutting into the petals, stamping on them etc.

Here's the finished project using Hot Pick 1305 and two of the flowers:


And a close up or two:


These images are stamped on acetate with white paint blocking out the back.
The background  is a piece of scrapbook paper that's been stamped over and set in an embroidery hoop - it goes in really well, nice and taught.
To see all the different flowers I made, hop on over to the PaperArtsy Blog.

Thanks for looking!
Helen 

Saturday 6 December 2014

Waxy Kraft paper...

Here's a card I made using some Portfolio'd waxy Kraft paper (both from PaperArtsy) as a background:


You just shave some of the Portfolio crayons, screw up in the waxed paper as if you were going to tie dye it and then heat. I've added touches of Aged Gold embossing on top.

Thanks for looking!

Helen

Thursday 20 November 2014

Full of Joy...

Yes, that's the name of my next class at The Craft Barn on Saturday 29 November.
We're going to be decorating  these large letters to make a Christmas bit of artwork for your mantelpiece that you can keep getting out for years to come:


I've chosen a turquoise, red and green colour scheme, but you can choose whatever colours you like, so if you fancy coming along and having some fun, just follow the link above!

Thanks for looking!

Helen

Sunday 16 November 2014

Something to brighten up your day....

Some flowers from the latest Ellen Vargo set from PaperArtsy.

These are lovely tall flowers and lend themselves well to a bit of Kaleidacolor on glossy card:


The background is an embossed resist technique using Papercrafter crayons.

Thanks for looking!

Helen

Tuesday 28 October 2014

Mixed Media Class

.... at The Craft Barn on November 9th, which is a Sunday.
The picture on the website is actually a prototype - we decided to do a slightly larger 12x12 canvas art board using lots of the Pebeo mixed media products.
So, if you fancy coming along and having a go at lots of different techniques, this is the sort of thing you'll be making:


Thanks for looking!

Helen

Friday 24 October 2014

It's Hallowe'en....

Well, almost!
Over on the Crafty Individuals blog they've got a spooky challenge this month as well as a Christmas one - plenty of choice.
For my first two projects I went for the spooky and birds!


Particularly enjoyed making the last one, mixing up lots of different stamp sets.

Thanks for looking!

Helen


Thursday 16 October 2014

Lynne Perrella, Portfolios and a heat gun!

I've got a post over on the PaperArtsy blog tonight using all of the above!
Here's a sneak peek:


If you hop on over you can see the finished card!

Thanks for looking!

Helen

Monday 13 October 2014

And some more...

Here are the other three cards I made for the class. This one uses heated crayons again:


Here they're used as a resist with Distress Stains


And here I've stencilled in white on the background:


And of course they all use Crafty Individuals stamps!

Thanks for looking!

Helen

Saturday 4 October 2014

Papercrafter Crayons...

Haven't tried these yet or want to try before you buy? Well, come along on Saturday 11 October to The Craft Barn and I've got an all day class trying out these fabulous crayons and various different techniques.
Here's a sneak peek of what we'll be making:


plus three other cards as well. Just follow this link if you want to join in the fun.

Thanks for looking!

Helen

Wednesday 1 October 2014

It's Christmas!

There's a lovely Christmas demo at The Craft Barn on Saturday with about seven demo'ers. There'll be all sorts of Christmas card ideas, so come along and have a look.
I'm demoing with the Woodware stamps and Cosmic Shimmer Shimmer paint - here are a couple of sneak peeks:


Hope to see you there!

Helen

Monday 22 September 2014

Feeling blue (and purple, and green!)

Here's the second ATC size piece of Stampbord that I made using a Stampers Anonymous stamp set from That's Crafty:


It's a very finely drawn, detailed collage so instead of using alcohol inks, I stamped it first and then coloured it in with Distress inkpads using cotton wool and cotton wool buds. There's loads of fantastic details to etch in. The buttons and the tiny metal leaves were tinted with Treasure Gold.


Thanks for looking!

Helen

Tuesday 16 September 2014

Tick, Tock.....

Not long ago I got hold of some ATC sized Stambord pieces and decided I just had to give them a go.
For this one I've used a stamp by Indigo Blu, some brown (yes, brown!) and green shades of alcohol ink and some embellishments made from a scrap of leftover real copper sheet.
Once the alcohol ink had dried, I rubbed it back a bit with a wet wipe, let it dry out completely then overstamped with black StazOn:


 I filled the clock face in with Glossy Accents (not very well as it turned out - I forgot to pop the air bubbles!)


And here are the die cut cogs:


Thanks for looking!

Helen


Friday 5 September 2014

That bird!

Last week I showed you a sneak peek of my Flower Power bird made with the new Darcy stamps - well, in this post I'll show you how I made her.
Start off with the 2 sets of stamps:

Eclectica³ Darcy 09    Eclectica³ Darcy 10

available from PaperArtsy and the papier mache bird available from The Craft Barn:

Papier Mache: Bird

Paint all over in white and then in the colours you've chosen:


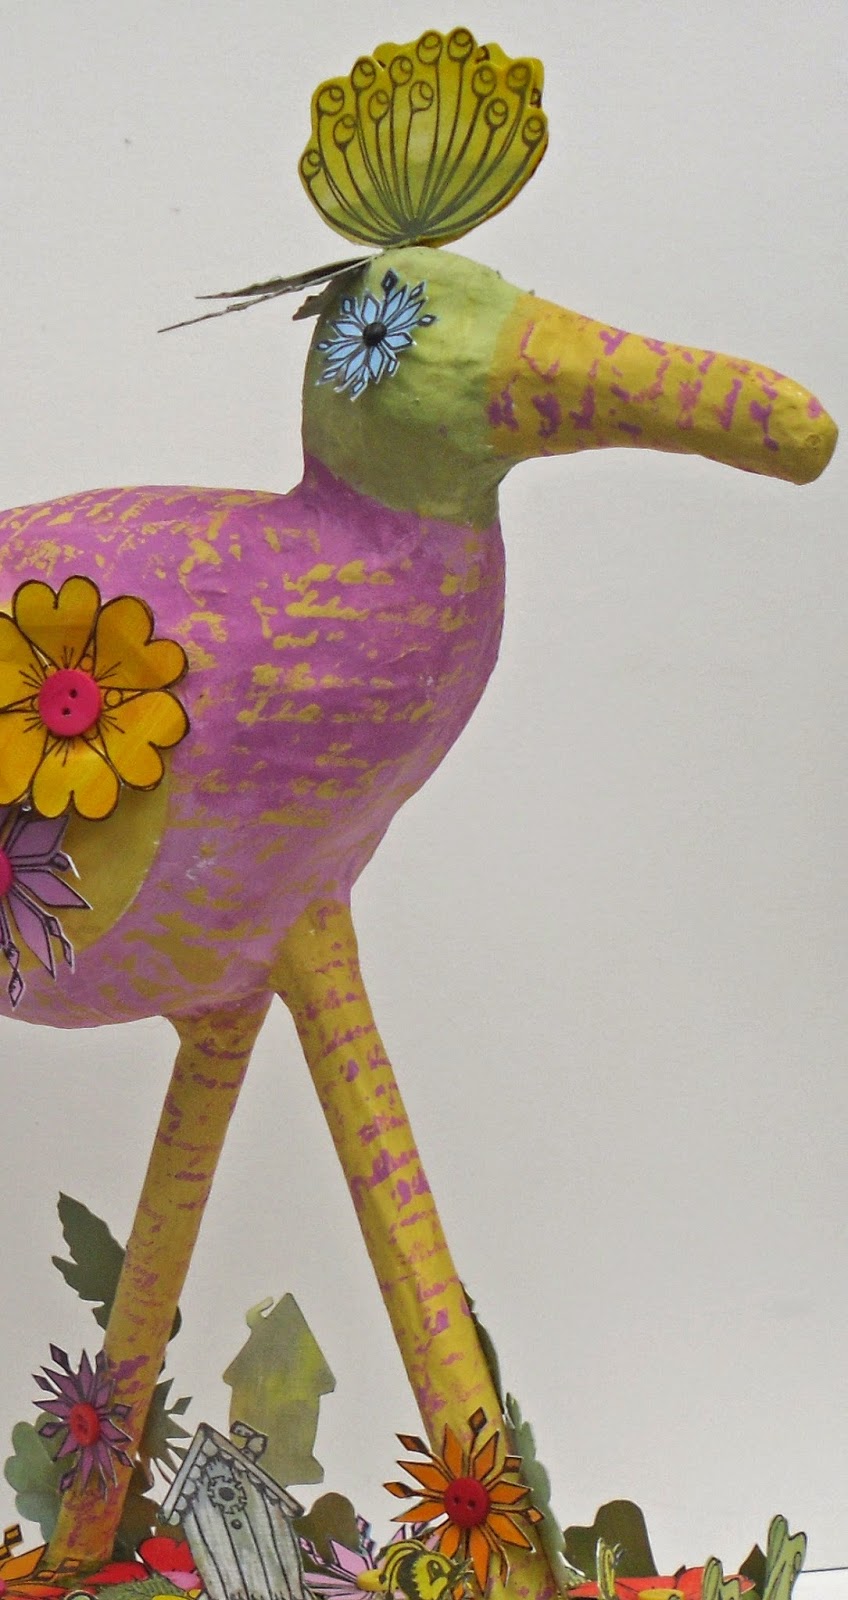
Here's where I got a bit stuck as I realised I'd got so carried away making the bird, I'd forgotten to take any more step by step photos! I'll show you some close-ups instead!
The body, legs and beak were all stamped in paint using the text from set EDY10, not using a block and just wrapping the stamp round the curves where necessary:


The flowers, grass, bird house, feathers etc. were all made by painting white card in various colours first and then stamping over the top and cutting out:


And here she is in all her glory, every which way but loose:


I'm going to have to make another one now to keep her company! Perhaps one for each season?

Thanks for looking!

Helen